Hello Hot Stuff

Last week, in my attempt to make spicy fermented pickles (say that 3 times real fast), I decided to pick some hot peppers from my garden. What I didn’t know, was these peppers were Serrano peppers and not Jalapenos, as I thought they were. They look very similar.

The last time I cut a jalapeno (store bought), I didn’t wear any gloves because it was very mild. My garden peppers, however, are not! I didn’t wear gloves this time and ended up with an intense burn on my hands that lasted hours. I tried everything from milk to apple cider vinegar. Nothing except ice would do anything.

I finally gave up and decided to drink some nettle tea, which has allergy and pain relieving properties. I drink it for allergy relief. Low and behold, the burning stopped. I don’t know if it was the tea, or just the pepper wearing off, but whatever it was, the burning finally stopped. Maybe the tea worked it’s magic and helped me out.

In the end I learned one very important thing, always wear gloves or protective gear when cutting hot peppers, no matter how mild you think it may be!


Buzzing Bees

I’ve spotted a ton of honey bees all around my flowers and vegetable garden this summer. They’ve helped me with a great deal of pollination and I now have some awesome vegetables because of their hard work. Bees are so important to have and I’m happy about the amount of bees I have around my garden.

I have a special place in my heart for the little buzzers. I grew up with a fascination for bees and wasps. They’ve always intrigued me and I’ve never been afraid of them. I have a great respect for bees. They hold so much power in their tiny bodies and do such a great service to human kind. They are definitely an underappreciated insect.

Blooms of Summer

When summer starts, the flowers come out! These are all the beautiful mid summer blooms around my yard.

Vegetable and Fruit Blooms:

Everything Else:

Sorrel

I have some sorrel growing near my dads garlic field and around our property. It’s a wild edible plant my parents grew up with in Ukraine. When I was a kid, we had it growing in our garden wild and now we have it growing here wild. My mom always called it bunny food, because it’s what rabbits like to eat in the wild.

Sorrel is an edible herb. There are many different types of sorrel and many different uses for it. It grows all over the place here in the northeast United States. It can also be a weed, growing around your garden.

We have sheep sorrel and common wood sorrel. Wood sorrel leaves resemble clover leaves and have yellow or white blooms. Sheep sorrel have reddish/yellow blooms and the leaves resemble a sword.  The leaves of both are a wonderful addition to any salad or soup. The leaves have a nice lemony sour flavor without being too harsh like a lemon. You can eat it raw or cook with it. It’s always a nice snack for me when I’m walking around my yard.

Clouds and Thunder and Rain! Oh My!

I just wanted to share some of the beautiful pictures I took at sunset after a thunderstorm.

20160718_20285620160718_20352720160718_203540

The moon was shining bright too! OK, this pic isn’t that great but it was really cool. And my new, but old/used phone takes much better pictures than my last phone, so this is a good picture compared to some others I’ve suffered with.

20160718_202831

Birdhouse Adventures

I love watching birds in all seasons and this property has tons of different kinds of birds everywhere with or without a bird feeder. Even hawks like to hang around, although that could be because of the chickens we have and the mice hanging around in our shed.

In February, I was working on painting some birdhouses. I’ve always loved painting birdhouses, but the cheap one’s from the craft store don’t hold up too well. So this time, I decided to secure them with tiny nails and a glue gun. I also did spray them with a sealer after painting them, which is not an Eco friendly way to go about doing this, but I already had these birdhouses laying around and didn’t want them to go to waste. At the end of March, I finally hung them up.


For two months, I watched and nothing. No birds would set up house in my colorful creations. This got a little frustrating, but I was also glad the birdhouses held up and any sealer smell would’ve been gone by then. I thought of many factors which could have affected why no feathered friends came for a stay:

Did I place it in the right place? Is there enough tree cover? The leaves were already there at this point. Did this area provide enough housing for them already and I didn’t need birdhouses? There was a perfectly beautiful robins nest right outside my window in a small tree. I couldn’t figure it out even though the problem was obvious. I even provided some nesting material in a bird feeder cage (which they did take).

Then, my mom pointed out, this tree is in a very open area and the houses are too far out. We moved them more into the tree and I even relocated two of them, where there was more cover, and voila! I now have residents in 3 of the 4 birdhouses I hung up. They like to yell at me anytime I pass by the houses now.

My neighborhood birds love bushes as any other bird would. I’m very sure it might have something to do with the amount of predators in our area. I’ve already herd from our neighbors there’s a black bear hanging around, herd a fox cry out at sunset, and have seen a hawk, falcon, or eagle stalking my dads chicken coup. They all love to eat my dads chickens when we’re not looking, so birds are not off the table.

Every habitat is different. The best advice I can give is to pay close attention to your own backyard, and go from there. Because we have an open field and not a lot of tall trees in the area, our birds like a lot of cover with there houses. So, if you don’t have any residents in your own birdhouses, pay close attention to where the others are hanging out. It gives you a great clue to figuring out where to place feeders, birdbaths, and birdhouses. Although birdhouses provide shelter and cover already, sometimes, simple tree cover isn’t enough. Just like some people like to live deep in the woods, so do birds.


Venus Fly Trap

A couple of years ago, I obtained a very cool Venus fly trap. I had no idea what I was doing with it and had never really tried to keep one alive. Surprisingly, it survived for about 2 or 3 years. All I did was replant the fly trap into a tomato container with some sphagnum moss and then tossed it into a glass fish bowl. I added some distilled water once in a while and it thrived. It even bloomed and gave me these beautiful white flowers.


It’s interesting how certain plants thrive in certain environments. Sometimes giving your plant a little bit of a cold shoulder can do it some good. I recently bought another Venus fly trap and tried to give it a little bit more TLC. Well, it didn’t turn out so good. It died within two weeks. Granted, my first one lived in a sun room and everything survived in there. It had a good, sunny, happy, nutrient deficient bowl. This recent one had similar surroundings, minus the intense sunlight.

Later, I found out that Miracle Grow Sphagnum Peat Moss is horrible to use if you want to keep a Venus fly trap alive. They hate nutrients and Miracle Grow adds fertilizer to their moss, which I would’ve known if I had looked at the ingredients. I purchased the moss before for a different plant and had it laying around. It was a good idea at the time. Lesson learned. Keep it simple and don’t use Miracle Grow for Venus fly traps. They like the simple life and so do I!

DIY Outdoor Citronella Candle Holders


20160706_142830

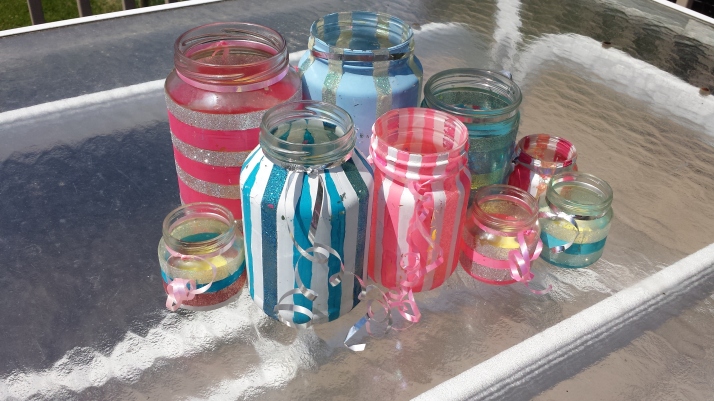
A few years ago, I made this for my nieces first birthday party. It was carnival themed, and outdoors. I came up with the idea from the monstrous amounts of mosquitoes on the property where the party was being held. This idea stemmed from a poor college students mind.

I basically wanted to find a cheap way to have anti bug candles without spending loads of money. You can buy citronella candles online in bulk for pretty cheap, so that’s exactly what I did. It’s less expensive then buying an already made candle, which can run anywhere from $5 and up.For this project, I ended up buying tea lights and votive citronella candles because I had different sized jars. I ended up spending only about $30 because I’m a crafter, and of course, had all the other supplies on hand. I collected jars over a couple of weeks and asked my family to save them for me. I used pickle jars, canning jars, baby food jars; basically any jars available. I made about 10-15 jars. 

A couple of things to remember:

  • Make sure the candles have citronella oil or scent in them. If they don’t, they will not repel bugs. Other scents such as mint, rosemary, or lemon work, but are not as effective.
  • Never spend more than 25 cents per tea light candles. They should be cheap and you should be able to get a whole bunch for under $10.
  • Votive candle are a little more costly, but last longer when lit. Look for one’s that last a a good number of hours. Mine last 10 hours.
  • Shop around online! Don’t look in one place! Make sure you’re getting a good price.
  • I’ve only had to change my candles once in the last 3 years and used them a fair number of times, so be aware, you will have left over candles for a while. 
  • My votive candles came molded together in squares because they melt in low heat. They’ll still be effective. I ordered them in July, so they melted for obvious reasons. This shouldn’t be an issue. Just break each off or grab a knife and cut them apart (always BE CAREFUL when using a sharp object and cut away from your body and fingers). 
  • If you so desire, and want to use these as a regular candle holder, you can. Just buy any scented candle or non scented you want and it works just as well. 

Warnings: 

  • Always use care when lighting candles. Fire is HOT and can BURN you. Melted wax is also HOT and can BURN you.
  • Although a lot packages say indoor/outdoor use. Citronella has an extremely strong scent, so I DO NOT recommend lighting them indoors if you are sensitive to strong smells. These candles are better used outdoors.
  • DO NOT leave the finished product in the rain. Always store in a dry place. If the wick gets wet, it’s hard to light and you don’t want a jar full of water. 
  • The ribbon around the candles in the photo is for DECORATIVE use only. It will MELT if left on. You can use fake, battery operated candles if you want to make these for decoration. 

Now that all the warnings are out of the way, we can get to the fun part. 

Clean your jars with soap and water to get rid of any debris or sticky stuff from the label. Use oil or De-Solv-it (it works great) if necessary to get rid of the label sticky stuff. 

20160709_142320
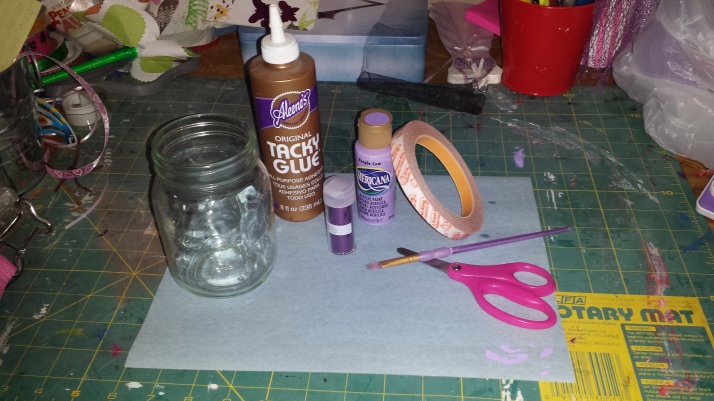
Supplies: Strong double stick tape (1/2 inch size), glitter, paint and paint brush, scissors, large paper (for catching glitter), and clear drying glue. Because I wanted a vintage carnival look, I used acrylic paint. Acrylic paint scratches off of glass easily, so I had no problem creating the look I wanted. If you want a more solid look, I suggest using a paint geared toward glass or using a liquid sealer over the acrylic paint. All these supplies can be found in any craft store. Frost king makes strong tape. You can find it in a hardware store if your craft store doesn’t carry it.


You can start with Step 1 or 2 first. Whatever your comfort level is, either one can be done 1st. 

Step 1 (or 2): Paint the lines on the jar, skipping spaces, creating a striped pattern. 2 coats if desired. Allow time to dry, about 20-30 min. If you paint the entire thing, the tape doesn’t stick. Alternately, you can do Step 2 first, then paint the jar for straighter lines.

20160709_132704

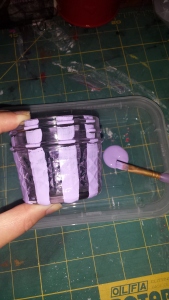
Step 2 (or 1): Add the double stick tape to the areas not painted. The best way to do this, is to not cut and guess what size you need. Just start at the bottom of the jar, leaving about a half an inch over the edge (as in the picture below) and work your way to the mouth, with the tape still on the roll. At the mouth, cut the tape to the edge of the glass. Fold the tape to the bottom of the jar. Alternately, you can cut against the edge of the bottom to get rid of the excess tape. If the tape doesn’t stick well in some places, just add a little bit of glue to keep it on.

Step 3: Peel off the tape protector. If desired and you started with Step 2 first, after you peel the protector off, you can paint the lines and the bottom of the jar to hide the tape. Allow the paint to dry before moving on to Step 4.

20160709_143307

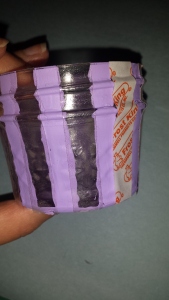
Step 4: Get your glitter on! Add glitter to the tape. Don’t roll the jar in glitter, as this can cause your tape to stick to whatever is under the glitter, such as the paper. Pour or sprinkle it on. Brush off an excess with your fingers or a soft brush.


Step 5: Add the candles. For the big jars I added at least 3 votive candles because that’s how many fit (make sure they sit flat to the bottom of the jar and not on top of each other). They melt together nicely to create 1 giant candle. For the baby jars, I used the tea lights. For the mediums, I used 1 votive.

Again: Don’t leave the ribbon on, it melts. 

Basil Salsa


20160711_194029

Beware, cutting tomatoes is messy!

I’ve been having a really huge crazing for some salsa, but hate buying the store stuff. It has all types of preservatives and random stuff in it, so I decided to make my own. I came up with this randomly. It tastes fantastic and I would definitely use it at a party or as a snack. It’s good as a side dish with lunch or dinner too.

Ingredients: 

1 red or green pepper

1 or 2 jalapenos (1 for mild, 2 for hot)

6 to 8 vine ripe tomatoes

6 cloves garlic, peeled and finely chopped20160711_185903

1/2 cup fresh basil, finely chopped

2 Tbsp Himalayan pink salt (or any salt to taste). Pink salt is weaker than regular table salt. Add less with table or sea salt.

1 Tbsp turmeric

1 tsp black pepper

1 tsp granulated garlic

1/4 tsp cayenne pepper

1 Tbsp olive oil

1 Tbsp lime juice

Any chip of your choice and some sour cream if desired.

Instructions: 

  1. Grab a medium sized bowl, a cutting board, and a good knife for chopping. For the tomatoes, you want to use a knife with ridges. A smooth knife will be hard to chop tomatoes with.
  2. Chop the tomatoes and peppers into small squares. Core the peppers to get rid of the seeds and white parts. You want the juice and seeds from the tomatoes, so add those to the bowl. Don’t worry about chopping perfect squares; all that matters is you get them to about less than half an inch. Add to the bowl.
  3. Core and chop the jalapenos into small pieces. Remember, jalapenos are hot! Wear gloves or wash your hands thoroughly after cutting. Add to the bowl.
  4. Peel and finely chop the garlic and fresh basil. Add to the bowl.
  5. Add right into the bowl the black pepper, turmeric, granulated garlic, cayenne pepper, olive oil, and lime juice.
  6. Add salt, mix everything well, pressing down with a large spoon to get the juice out of the tomatoes. Taste and add additional salt if desired.
  7. Dip your chip of choice right in and enjoy!!!

Hint: Dip the chip in sour cream first and then the salsa. It tastes delicious!


Fairy Gardens and Bad Placement (Part 3)

The last time I posted about my super cool fairy garden, I didn’t have too many things going on around fairy land. These pictures are a bit out dated because I’ve updated the garden since. I’ll show these updates from a couple of months ago first.

I definitely underestimated the amount of work that needs to be done to maintain a fairy garden. As of right now, before I post current pictures, I need to do a little bit of cleaning. There are a lot of webs, leaves, and debris that needs clearing before pictures can be taken.

Some things I learned in fairy land:

  1. If you decide to do a fairy garden, treat it like real estate. Location, location, location! It matters where you place it. If you put it under a tree, choose one that doesn’t release a lot of debris. Flowers, pollen, fruit or leaves can make a big mess. I placed mine under a tree with all that not so fun stuff.
  2. Mulch! It’s your best friend. It makes your fairy garden look tidy and all the bright colors pop.
  3. Maintenance is required! I let mine go and it got bad. Every few days, webs should be cleared, and any stray objects/debris should be picked up.
  4. Have fun! Nothing can be perfect, so don’t stress it!


A little help from my friends:

Which way should we go?

Oh well!


This is where my inspiration came from for the well:


This image is NOT mine. I found some great ideas here via Pinterest (It’s in a language I don’t comprehend, but has some great ideas and google translate helped):

http://ambientebariri.blogspot.com/2015/05/mini-jardim-ou-fairy-garden.html